项目背景:
DIY好玩捏
电路工作时有时需要检查元件发热情况,但用手触摸元件有一定的风险,因此需要一种无接触式的多点测温设备
于是开始了解到热成像这个测温方式,以下是软硬件方案
方案:
硬件部分
采用上下两块板子对插组合,为了减少复杂度,留了排母方便直插LCD与传感器模组。
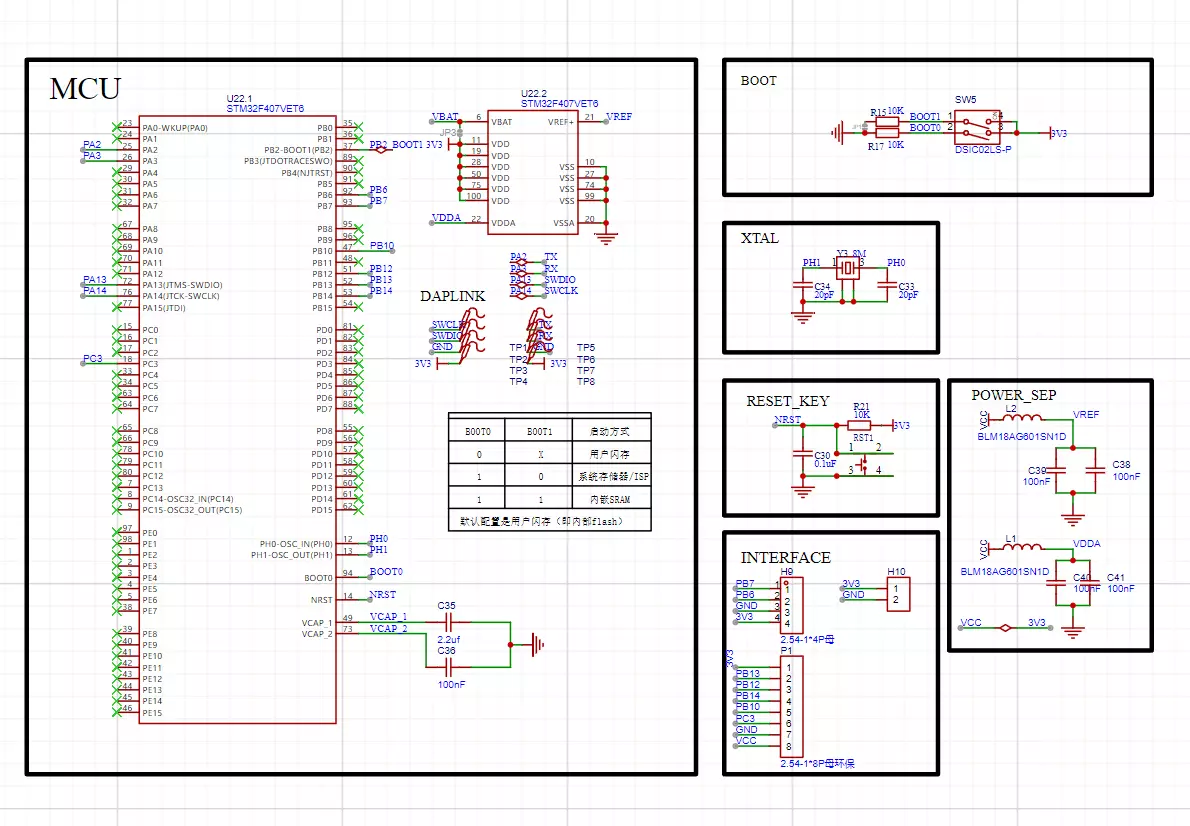
BOARD1: MCU与外设
- 采用STM32F407作为主控,512KB Flash,其实没特别注意选型,只是手上有这个开发板,要压缩成本的话用其他型号也可以
- 红外传感模组为MLX90640 BAA,这个价格比较贵,比其他元件加起来都贵
- 屏幕模组为1.44寸TFT-LCD,也是现成的,买了俩还剩一个,下次做别的东西的时候给用了吧
- 留了串口测试点和烧录测试点
BOARD2: POWER
- 3.7V锂电池供电,可通过USB接口经过LGS4084H电源管理芯片给锂电池充电
- 经过一个LDO稳到3.3V给MCU整体供电,VDDA和VCC用磁珠滤波隔离了一下
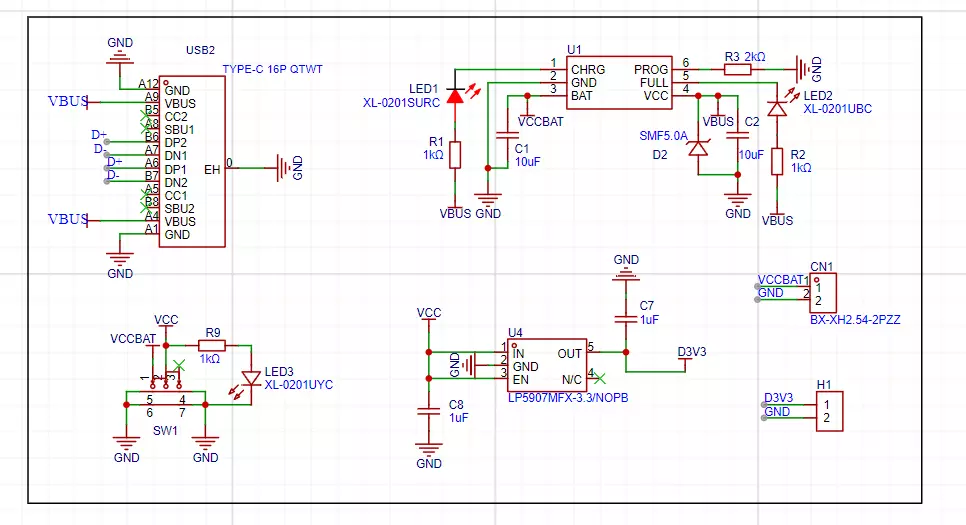
电源板后续涉及锂电池供电DIY的倒是可以继续沿用
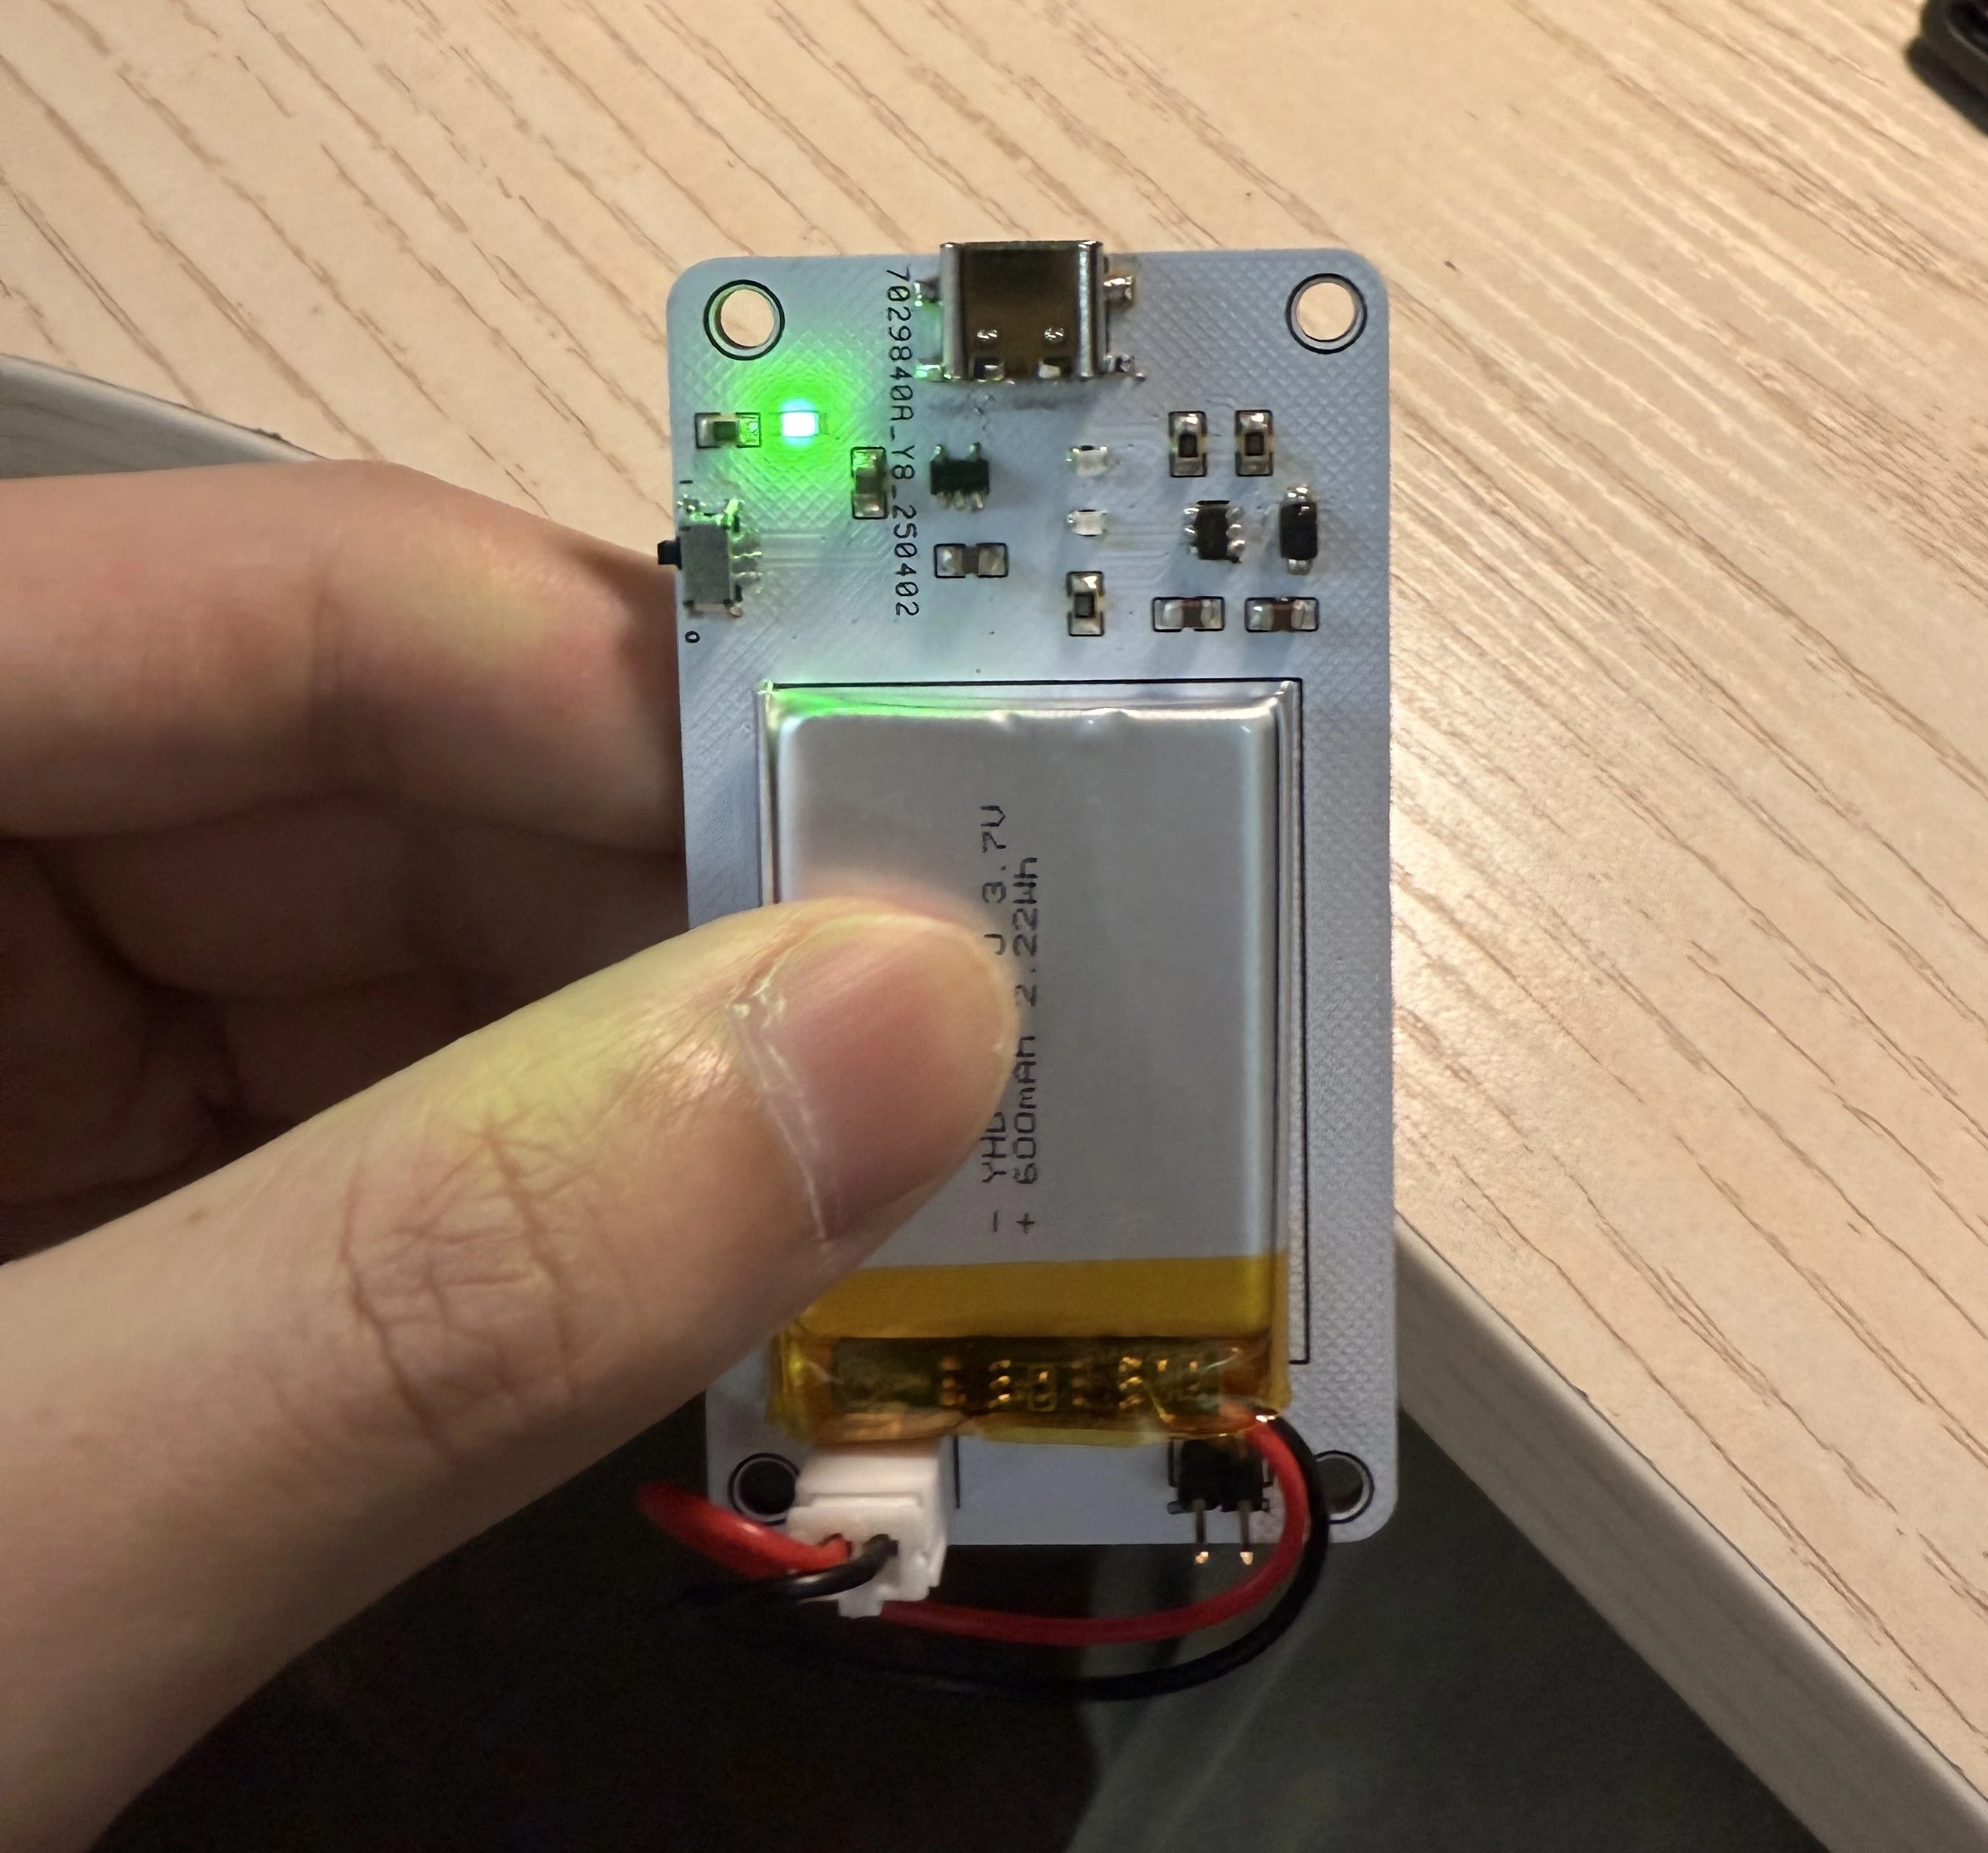
立创打样PCB,自己贴片,PCB板框留了一些M3螺孔方便组装。
软件部分
通讯接口涉及IIC与SPI,以及图像测试的时候用了一下UART,均比较基础。使用硬件IIC进行传感器模组与MCU间的通信,模组官方提供了接口可调用,可读取温度值。RGB转换用了开源的函数:
/*pass in value and figure out R G B
    several published ways to do this I basically graphed R G B and developed simple linear equations
    again a 5-6-5 color display will not need accurate temp to R G B color calculation
    equations based on
    http://web-tech.ga-usa.com/2012/05/creating-a-custom-hot-to-cold-temperature-color-gradient-for-use-with-rrdtool/index.html
  */
static uint16_t TempToColor(float val){
  red = constrain(255.0f / (c - b) * val - ((b * 255.0f) / (c - b)), 0, 255);

  if ((val > minTemp) & (val < a)) {
    green = constrain(255.0f / (a - minTemp) * val - (255.0f * minTemp) / (a - minTemp), 0, 255);
  }
  else if ((val >= a) & (val <= c)) {
    green = 255;
  }
  else if (val > c) {
    green = constrain(255.0f / (c - d) * val - (d * 255.0f) / (c - d), 0, 255);
  }
  else if ((val > d) | (val < a)) {
    green = 0;
  }

  if (val <= b) {
    blue = constrain(255.0f / (a - b) * val - (255.0f * b) / (a - b), 0, 255);
  }
  else if ((val > b) & (val <= d)) {
    blue = 0;
  }
  else if (val > d) {
    blue = constrain(240.0f / (maxTemp - d) * val - (d * 240.0f) / (maxTemp - d), 0, 240);
  }

  // use the displays color mapping function to get 5-6-5 color palet (R=5 bits, G=6 bits, B-5 bits)
  return BSP_LCD_GetColor565(red, green, blue);
}
该传感器成图32x24像素,而使用的LCD是128x128的,于是我用4个像素作为一个大像素来填充,并增加了一个图例和一个最大最小值来提供量化,并填充一下屏幕留白
static void drawPicture(void) {
    uint8_t cell_size = 4; // 格子大小 4x4
    uint8_t start_x = 0;   // 水平居中(128 - 32*4 = 0)
    uint8_t start_y = 16;  // 垂直居中((128 - 24*4)/2 = 16)
    for (y = 0; y < 24; y++) {
        for (x = 0; x < 32; x++) {
            ST7735_FillRectangle(
                start_x + x * cell_size,
                start_y + (23 - y) * cell_size,
                cell_size,
                cell_size,
                TempToColor(tempValues[(31- x) + (y * 32)])
            );
        }
    }
}
static void drawLegend(void) {
uint8_t legend_height = 5; // 图例高度(像素)
uint8_t legend_y = 0; // 图例顶部位置(y=0)
uint8_t legend_width = 120; // 图例宽度(留左右边距)
uint8_t start_x = 4; // 图例左侧起始位置(x=4)
// 绘制温度颜色渐变条(水平方向)
float temp_range = maxTemp - minTemp;
for (uint8_t x = 0; x < legend_width; x++) {
float temp = minTemp + temp_range * (x / (float)legend_width);
uint16_t color = TempToColor(temp);
// 绘制水平线(从左到右)
ST7735_DrawLine(start_x + x, legend_y, start_x + x, legend_y + legend_height, color);
}
// 显示最小/最大温度标签
// memset(tempBuffer, 0, sizeof(tempBuffer));
sprintf(tempBuffer, "<%2.1f ", minTemp);
ST7735_WriteString(2, 115, tempBuffer, Font_7x10, ST7735_WHITE, ST7735_BLACK);
//// memset(tempBuffer, 0, sizeof(tempBuffer));
sprintf(tempBuffer, "%2.1f> ", maxTemp);
ST7735_WriteString(90, 115, tempBuffer, Font_7x10, ST7735_WHITE, ST7735_BLACK);
}最后在主循环里轮询就可以了,屏幕刷新率一般,眨眼补帧。
整体软件部分比较清晰,本来想加一些按键交互,修改颜色范围,存储图片到外部flash之类的功能,然后懒了。
后续学了操作系统和LVGL库之后再搞点好玩的吧,感觉大部分DIY应用裸机完全够了…

小问题合集:
problem1:使用ST-Link下载过一次程序后发现无法继续下载
- 检查设备管理器,确保有正确的ST-Link驱动
- 检查Keil软件配置,确保导入正确的型号版本
- 检查引脚配置,发现问题:

配置的IIC通信引脚占用了SWD下载引脚(STM32默认的PA13 &PA14),引脚输入输出模式不适配,显然后续无法下载,遂改之,问题解决。(图示仅供参考)
problem2:HardFault中断触发
栈空间不足,多分配点就ok